Angular has a prerender support once called Angular Universal which recently merged into the official
@angular/platform-server package. It’s official guide for universal is still working in progress. It requires a lot of configuration if you have read
the document. Most important is you need to setup and AOT configuration and use @angular/compiler-cli to compile your source code.
But if you want to know how to use this feature in a briefly way without touching too much concept like express. Read this article. I’ll show you
an extreme concise example to setup a very basic prerender application.
Here we go.
Step 1
Setup a basic angular project. In this example, we have only one component and module
To make sure server can bootstrap this app, A server module is also needed. The important part in AppServerModule is that it imports a module called
ServerModule from @angular/platform-server. This module has some server replacement for the browser provider in BrowserModule.
After having these files in hand. use ngc (Angular Compiler) to compile these files, but before continue, let’s dig into the tsconfig.aot.json file
to see something important for compiling with ngc.
To make AOT compiled code, you should use es2015 as module resolution, this will be convenient for import ngfactory and treeshaking. also
their are a little options which related to angular compile. angularCompilerOptions.genDir will setup the output path for ngc, all your compiled
module will be output in that path. angularCompilerOptions.skipMetadataEmit property prevents the compiler from generating metadata files with the compiled application.
Metadata files are not necessary when targeting TypeScript files, so there is no reason to include them.
Then, use $(npm bin)/ngc -p tsconfig.aot.json to generate AOT files. You’ll get compiled directory in your project root. like this.
You may have noticed, the only difference between main.browser.ts and main.browser.aot.ts is In JIT, it use the AppModule directly and bootstrap
that module using platformBrowserDynamic.bootstrapModule(), while in AOT, it use platformBrowser.bootstrapModuleFactory() to bootstrap an ngfactory
from compiled file.
that’s the different. AOT compiled component and in file bootstrap, it won’t load JIT compiler, this will make the final shipped code smaller.
import {renderModuleFactory} from '@angular/platform-server'; import {AppServerModuleNgFactory} from '../compiled/src/app/app.server.ngfactory'; import * as fs from 'fs'; import * as path from 'path';
let template = fs.readFileSync(path.join(__dirname, './index.html'));
This file looks different from the previous two. it import zone-node instead of zone, because zone-node can be run in nodejs, zone cannot.
Because what we need is a string of the final html page. a factory called renderModuleFactory from @angular/platform-server is used here to
bootstrap our AppServerModuleNgFactory which is imported from compiled code.
At last, you can run ts-node to get the string of rendered app.
Is that over. exactly. No, Prerender also involve a transition step when app has loaded into browser and your browser module has taken over all
the state from server prerendered page. But this is the mainly about webpack configuration, what you need is build a bundle and shipped with the
generated html document from renderModuleFactory. and use preboot.js to make the state transition.
By reading this sort article, you now setup a up a very basic project without touch any unnecessary configuration. but to make a useful application,
you still need to learn how to tame webpack and build a bundle for browser. I may write something about this in the future.
Recently, I’m working on an solution to show vast amount of card in a list and scroll smoothly on this list. Further more, the list should
show a timeline meter on the side to allow user navigate to any position quickly just drag or click the timeline. This feature pose a challenge
to develop a new kind of UI component which able to show any amount of card in screen without impact the performance.
A tradition way to show large amount of data in a list is so called infinite list or lazy loading . A list loads data at 20-30 items per page until user reaches
bottom of the list. then bumps the next page of data and appends to current list. This solution actually contributes to the initial loading
performance but did not too much to the overall scrolling performance. Using this solution, user cannot quickly scroll to the last position of data.
even worse, when you have loaded 2000-3000 items, your tab crashes.
Find Another Approach.
The reason why lazy loading or traditional infinite list doesn’t work is obvious. As long as you continue added items into your list, those
DOM elements will exists until eats up all of your memory. So this solution is not fit for our requirements.
If you ever have some experience on Android or iOS development. You may find the solution which has developed for a long time. Yes, that’s
ListView (or RecyclerView, GridView) in Android and UITableView in iOS. They both use a similar idea which keep a limited amount of item on
the fly and trash the view which is out of current viewport. To reduce the performance expense on create new views, they also recycle the
trashed views and reuse them on demand. So this idea is what I choose for solving this problem.
First, How does this solution work?
The core of this solution is only maintaining a limited number of views in the list and keep remove and added necessary views into list when user
scrolling the list. To make this possible we need to know the height of each view before performing a layout to place those views. In Android,
the framework using a measurement procedure, but at web, we don’t have that mechanism, the dimension of an DOM element is control by css along
with the element parent. So measurement on DOM is hard to do, we don’t want to discuss this topic at this article. We use a predefined height
for each row. By doing this, we simplify the calculation of layout.
Another requirement to make this solution possible is we need to know the total number of items of our list. This is usually not much hard to do.
To make things simple, we also make a little change, we have all data loaded once, so we don’t need to write load on demand.
Once we prepared data and container finish its layout, we will get container height , number of rows, row height . these information
is pretty enough for our list view to render a initial state.
As you can see, our initial state only contains very limited number of elements. This is what we expect, another information we got from
this picture is we have a scrollbar which indicates we have very long content to scroll. we use a straight forward method to calculate the total
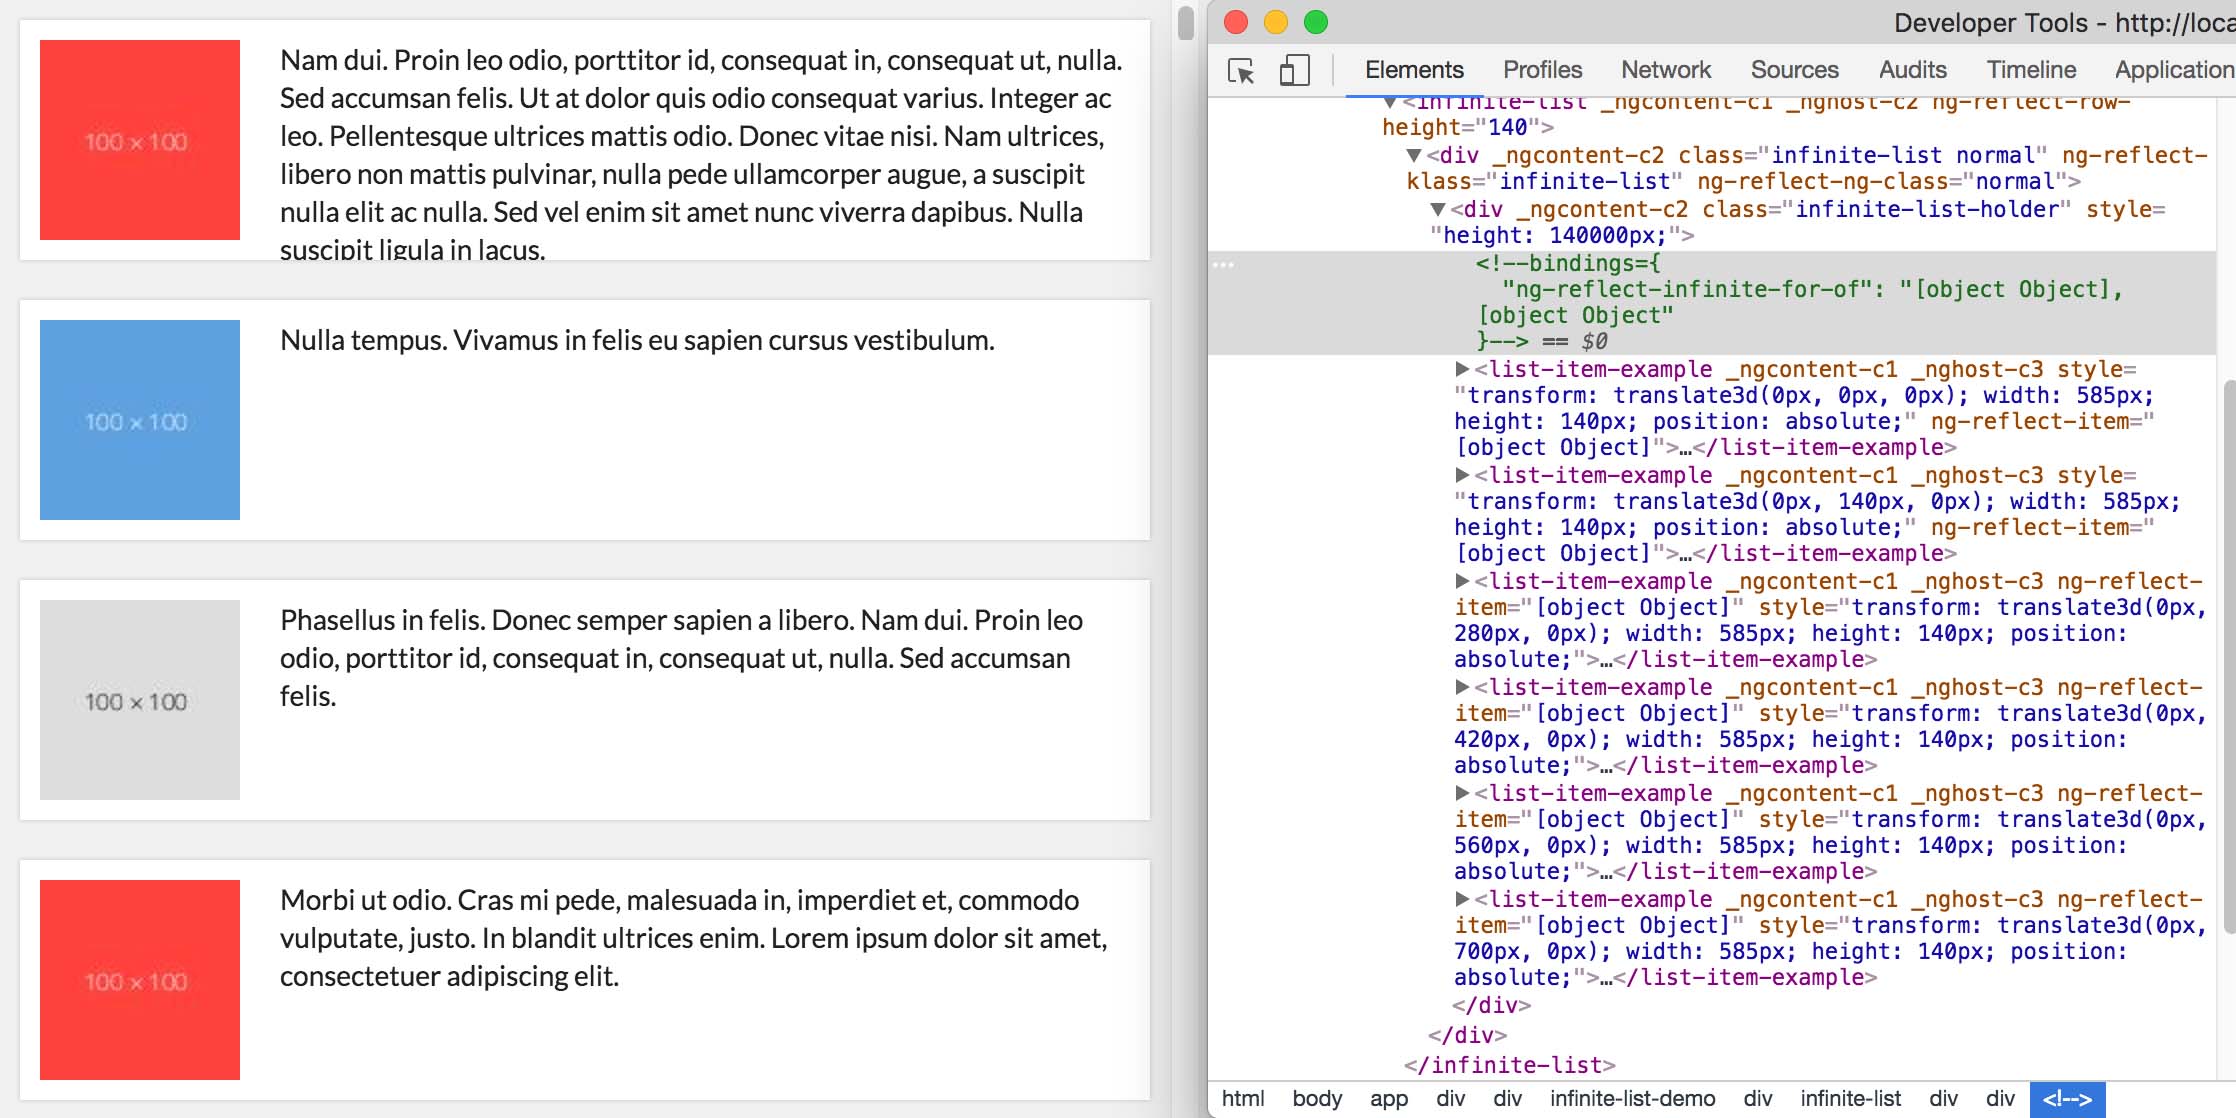
height of scroll content by simply multiply row height and item count. Here is the main DOM structure to make this possible.
1 2 3 4 5 6 7
<!-- infinite-list has a height of 100% viewport height this height will be used to determine how many views to render --> <divclass="infinite-list"> <!-- infinite-list-holder has a height of all --> <divclass="infinite-list-holder"style="height: 140000px;"> <list-item-example></list-item-example> </div> </div>
infinite-list is the container of visible views, it use a overflow-y: auto css to make the infinite-list-holder scrollable.
When this structure is established, browser will render a scrollbar for infinite-list.
When user scroll down or up, the infinite-list-holder will scroll and together with its view content. meanwhile we listen to the
scroll event to asynchronously calculate how far we have scrolled from initial position.
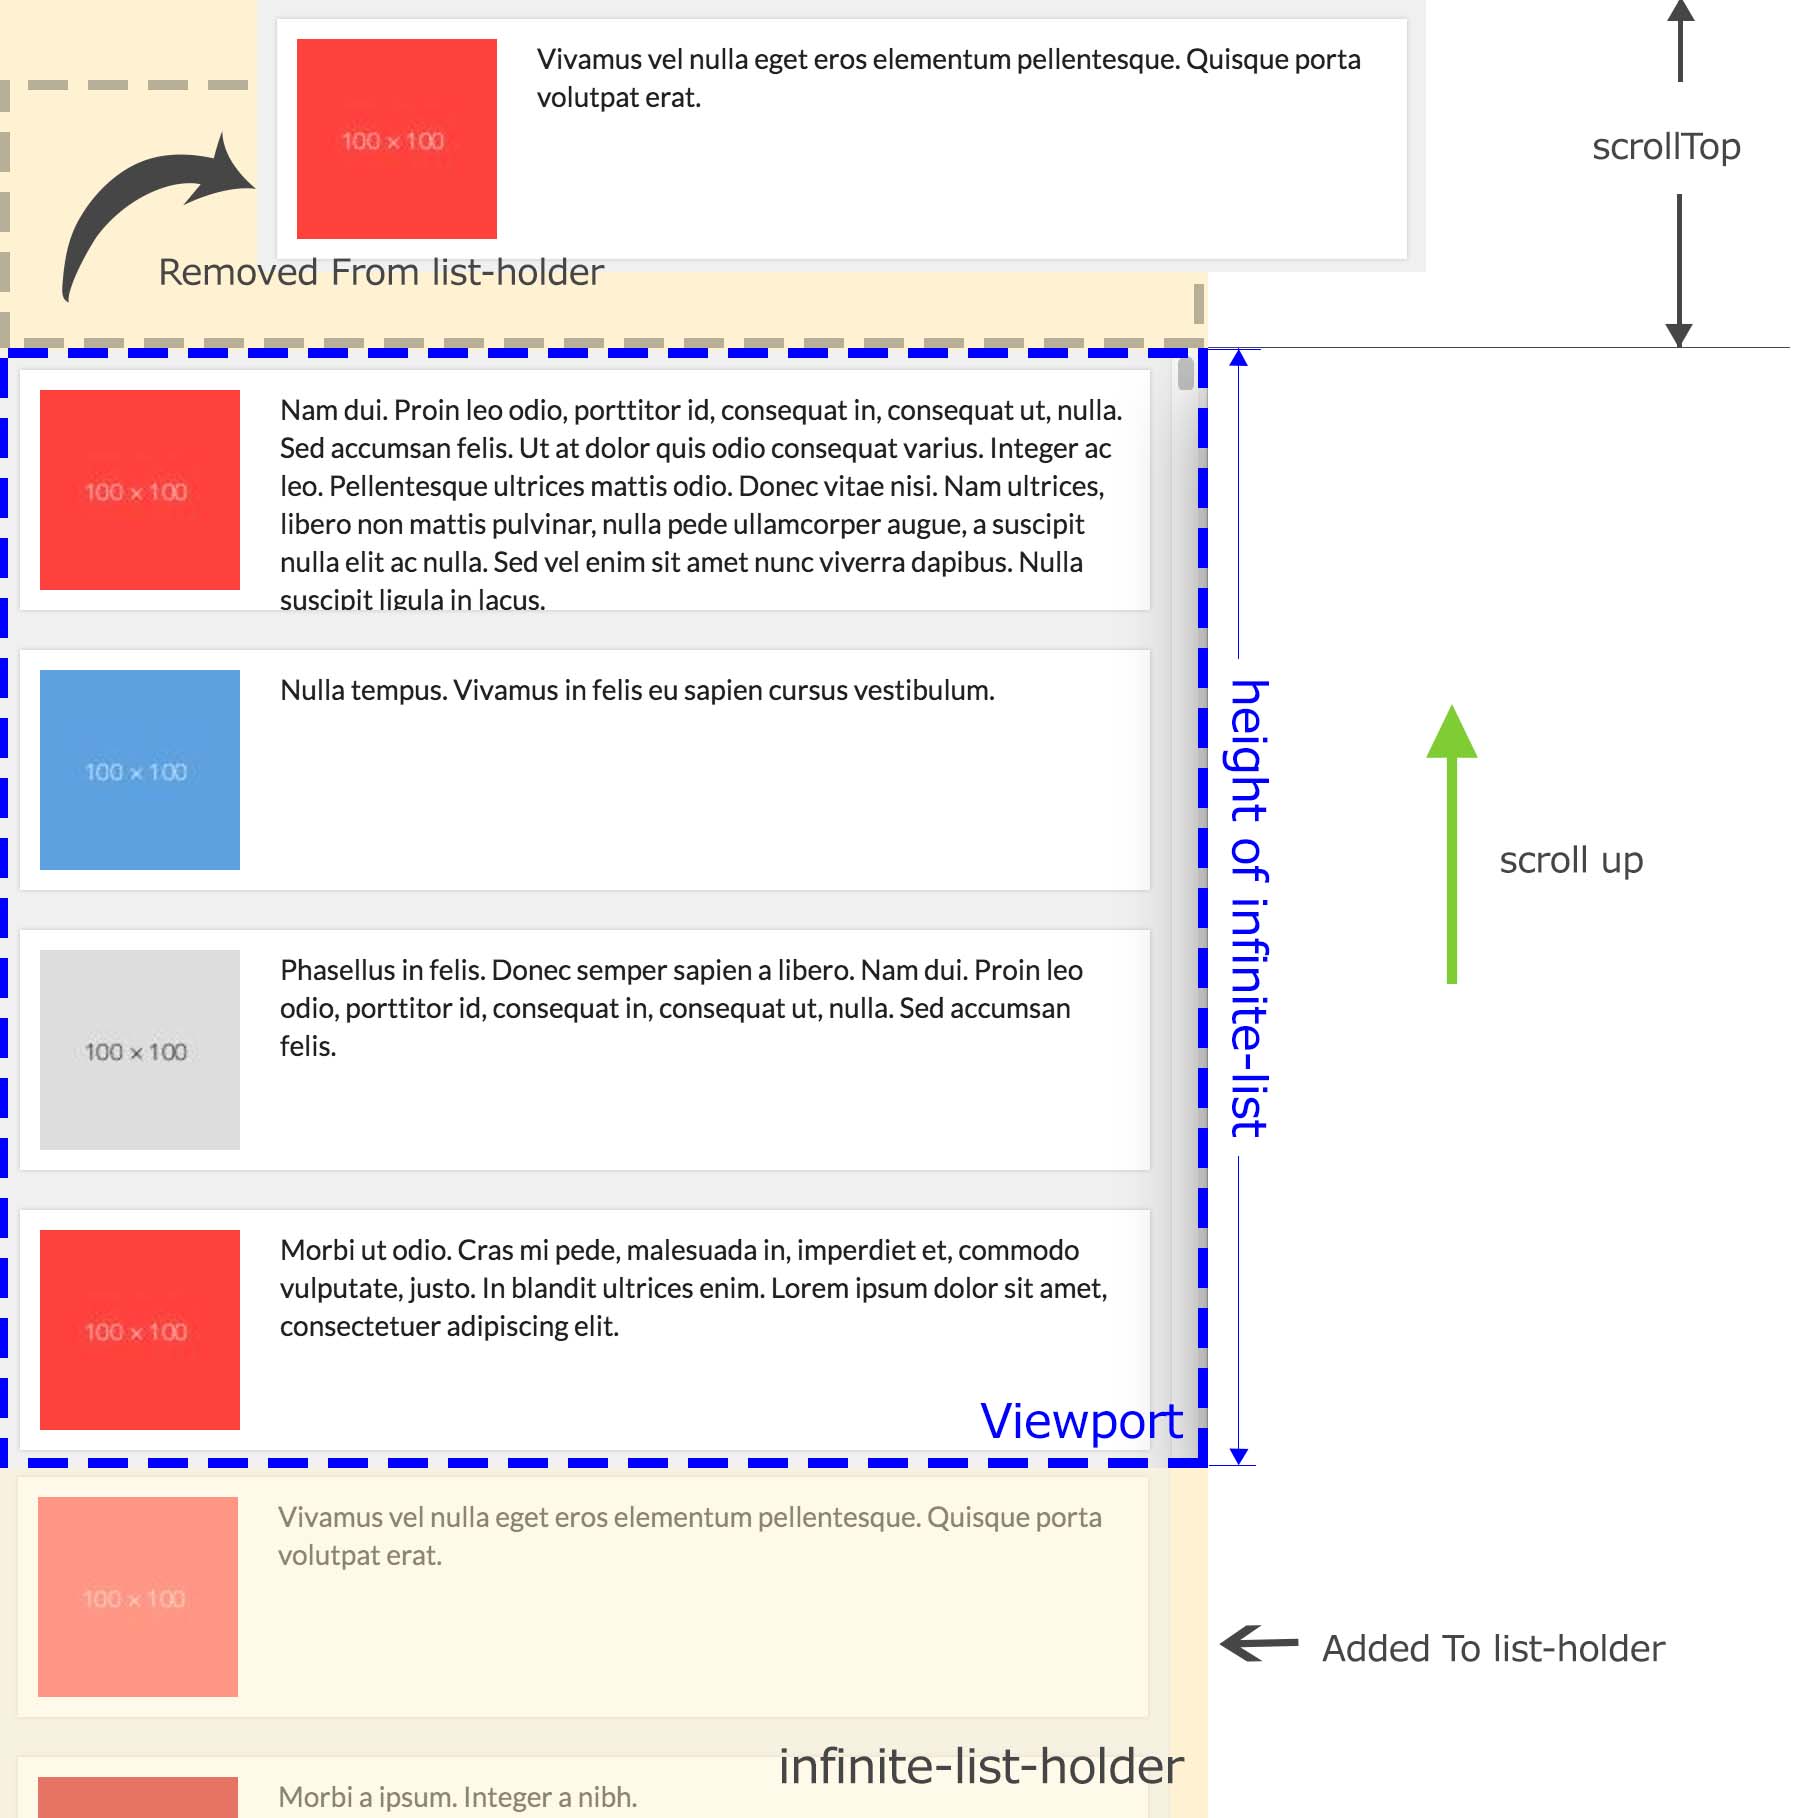
THE key part of the solution can keep a low memory usage is keep calculating every view position relative to viewport, add views which
are about to visible in the viewport and remove views which is already out of viewport.
This is really very intuitive solution. keep added and remove views as long as there are the right views in our viewport, user will feel
like our list is filled with all of the data items. OK, this is simple. But how do we know which view is out of viewport, which view is
about to add in viewport and how to place them in the correct position.
Do the layout
we already have some basic information about our container infinite-list, we know its width and height. we also get height of every row
and total number of data. when we do layout at scrolling, we need one more information to know how much have we scrolled. This is not hard
to obtain. In all browser, we can use element.scrollTop property to know the relative distance between top of the scrolling content and
top of the wrapper content. (More detail, you can learn from MDN)
Calculate the index of top most view relative to our viewport, remove any views before that index.
1
let firstIndex = Math.floor(scrollTop / rowHeight);
Calculate the index of bottom most view relative to our viewport, remove any views after that index.
1 2 3 4
// we need this offset to complement the height of viewport. because a view may just cross the border of list-container let firstViewOffset = scrollTop - firstIndex * rowHeight; // containerHeight is equal to viewport height as we assumed let lastIndex = Math.ceil((containerHeight + firstViewOffset) / rowHeight) + firstIndex;
Once we get the index range, we can remove view not inside this range and added views according this range. To added view at correct position,
we need calculate its top y coordinate relative the list-holder.
This calculation is more easy. We can calculate a view y position base on row height and data item index:
A view top y position relative to infinite-list-holder is rowHeight * index
The method we use to place our views on infinite-list-holder is using css3 translate3d and let each view’s position property be absolute.
By using this method we get the hardware acceleration and not trigger any re-layout out side the infinite-list-holder. This is another
important performance trick.
Once styles is applied. insert view into infinite-list-holder at proper position, browser will render the view for us.
This process will repeat whenever we need to do a layout operation. At the user aspect, the view will really scroll in the list.
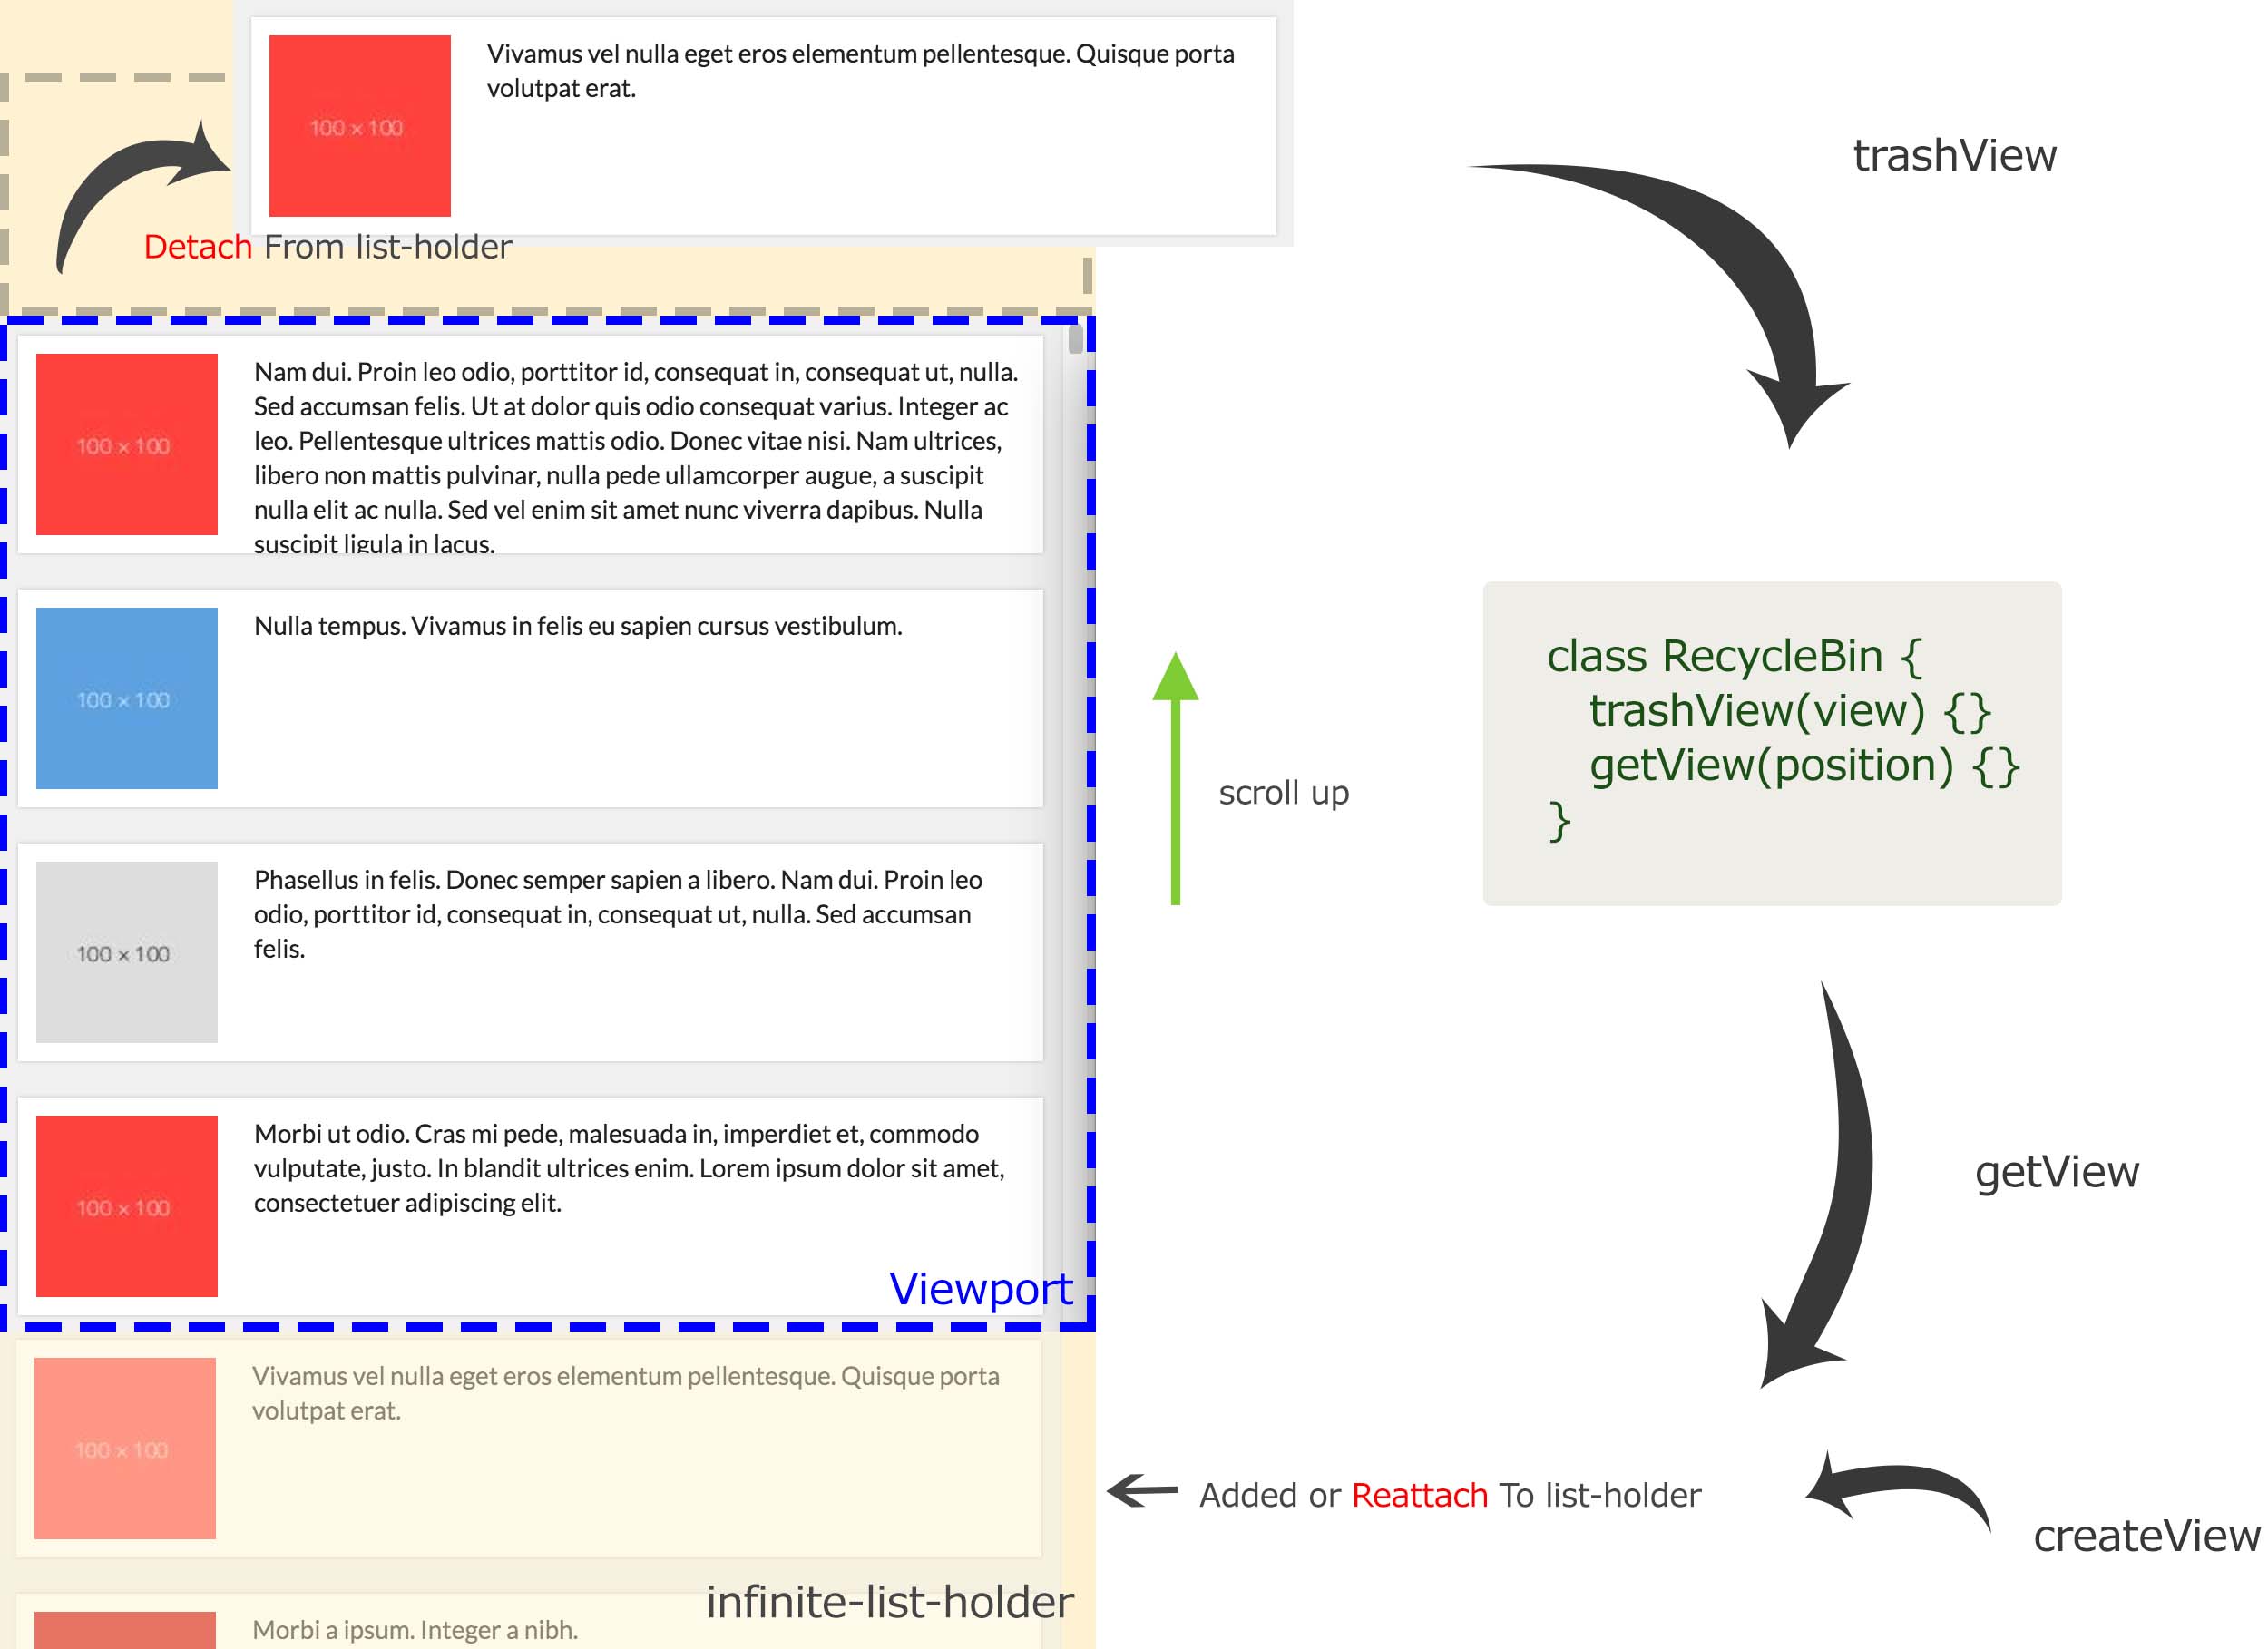
Optimization.
So far so good, We have give a smooth scrolling experience to user using our real infinite-list .but currently we only create a very
simple example which using a simple structure for item view. What if we have a very complex view to render. we need to rapidly remove and
add DOM element to our list-holder, the view element may have many object to initialize. many listener to add. Creating new object especially
DOM element object is expensive. Those views in our list are very the same structure, the only different is there content. so we decide to
do some optimization to reuse the views.
To reuse view, we need modified our solution at two phase, remove and add phase. At remove phase, we don’t directly destroy that trashed view,
we detach that view and move it into a recycle bin. we can create a class called RecycleBin to manage those recycled views. At add phase, we
first try to retrieve view from RecycleBin, if we find the same view with the same index we expect, we can directly reattach it back to list-holder,
because its content is the same. But if we don’t have that type of view, we can also pop a view from scrap views, and replace its binding data
with correct data at certain index. If you use a MVVM framework, the framework will do the rest things. only when we don’t have scraped views
from RecycleBin, we create a new view with data of certain index.
Our modified version reduce the dom create and destroy, also reduce the new memory allocation and GC operation (though this is really depend
on JS engine). A drawback of this modification is we increase a little more memory usage. But if you can write some simple strategy to control
the total number of scrap views. No need to worry about run out of memory.
So far we have briefly explained how our solution work. But we haven’t explained how to implement in Angular.
The Angular Implementation
we only cover the Angular 4 and above, if you want to find an AngularJS (1.x) implementation. You can read the code from this repository to see how to
implement this approach in Angular 1.5, although this is grid view which is a little complicated.
In Angular, things are not much different. We still use the theory we have explained before plus a little angular feature.
In Angular, there are component and directive ( include structural directive ) which can manipulate DOM as we need. Recall our feature requirement,
Our list, in fact, has repeat structure which presents data in same form repeatedly. The idea flash in your mind first must be ngFor directive which
is a structural directive can clone its content repeatedly. The difference between ngFor and our directive is ngFor render all DOM in the collection
we don’t. So we use a similar directive called infiniteFor which has a very same usage.
1 2 3
<any *infiniteFor="let row of collection"> {{row}} </any>
By using these semantic we borrowed from ngFor, we can create a local variable binding to its template from the iterable collection
In Angular we don’t have the concept scope but it is a very similar concept which using an object to store your local variable and bind to the template.
We won’t use too much words to describe how ngFor implement. if you don’t understand and have interest in this, you can read official document:
Structural Directive and ngFor API Guide
// This is a major difference from ngFor directive, we actually need store the whole collection to a data structure (we use array) private _collection: any[];
@Input() infiniteForOf: NgIterable<T>;
@Input() set infiniteForTrackBy(fn: TrackByFunction<T>) { this._trackByFn = fn; }
get infiniteForTrackBy(): TrackByFunction<T> { returnthis._trackByFn; }
@Input() set infiniteForTemplate(value: TemplateRef<InfiniteRow>) { if (value) { this._template = value; } }
ngOnChanges(changes: SimpleChanges): void { if ('infiniteForOf'in changes) { // React on infiniteForOf only once all inputs have been initialized const value = changes['infiniteForOf'].currentValue; if (!this._differ && value) { try { this._differ = this._differs.find(value).create(this._trackByFn); } catch (e) { thrownewError(`Cannot find a differ supporting object '${value}' of type '${getTypeNameForDebugging(value)}'. NgFor only supports binding to Iterables such as Arrays.`); } } } }
ngDoCheck(): void { if (this._differ) { const changes = this._differ.diff(this.infiniteForOf); if (changes) { this.applyChanges(changes); } } }
private applyChanges(changes: IterableChanges<T>) { if (!this._collection) { this._collection = []; } let isMeasurementRequired = false;
if (isMeasurementRequired) { this.requestMeasure(); }
this.requestLayout(); } }
Instead of directly react on data changes, we need to store the whole data set into a collection because we may use it later,
But IterableDiffer is still a useful tool to manipulate our data collection without need to learn the actual data structure of source data.
when any changes of data happen, we mark a isMeasurementRequired to determine whether we need to recalculate the list-holder height.
This is needed when we change the size of collection. Whenever a change happen, a layout is requested.
Consider when we should do the layout. By learn the feature of our component, we can find three timing to do layout:
After a measurement. (data set size changes, container dimension changes)
scroll event happens.
data changes
The actual layout is the core process. we will break it into several parts.
private layout() { if (this._isInLayout || !this._collection || this._collection.length === 0) { return; } this._isInLayout = true; let {width, height} = this._infiniteList.measure(); this._containerWidth = width; this._containerHeight = height; this.findPositionInRange(); for (let i = 0; i < this._viewContainerRef.length; i++) { let child = <EmbeddedViewRef<InfiniteRow>> this._viewContainerRef.get(i); this._viewContainerRef.detach(i); this._recycler.recycleView(child.context.index, child); i--; } this.insertViews(); this._recycler.pruneScrapViews(); this._isInLayout = false; this._invalidate = false; }
we first check the prerequisites, we should not do layout when:
A layout is performing.
Collection is empty.
Then update containerHeight because we need this in findPositionInRange,
After we do findPositionInRange( which is actually calculate the first and last index need to be in list-holder). we detach our existed views
in list-holder. and re insert needed views back into it. after all job is done, we also prune the recycle bin to make sure it will not bloat too big.
How we implement findPositionInRange has been explained in the previous section. the start index and end index is exactly follow those formula to calculate.
So the next important thing is adding views back to list-holder. the getView method first try to get views from recycle bin, if not find, create a new EmbeddedView
with InfiniteRow object, this object is a data structure provide the data and some information like index, count. it has important property $implicit which is used
by angular core to binding our data to view.
Once we get the view, dispatchLayout method will do the rest job to place views (applyStyle and insert).
private dispatchLayout(position: number, view: ViewRef, addBefore: boolean) { let startPosY = position * this._infiniteList.rowHeight; this.applyStyles((view as EmbeddedViewRef<InfiniteRow>).rootNodes[0], startPosY); if (addBefore) { this._viewContainerRef.insert(view, 0); } else { this._viewContainerRef.insert(view); } view.reattach(); }
We have nearly all done. But because we separate the component into two pieces. we haven’t implement the container component InfiniteList.
It is responsible for listen to scroll event, resize event and set the height to list-holder, it has a simple dom structure:
By using ng-content we can put all element generated by InfiniteForOf directive. The important thing behind the html is a css definition.
We must make infinite-list overflow-y: auto and give it a limit height (if you container element have a height, you can use 100%)
1 2 3 4 5 6 7 8 9 10 11
.infinite-list { overflow-y: auto; overflow-x: hidden; position: relative; contain: layout; // this is performance trick, you can lookup this css property in MDN -webkit-overflow-scrolling: touch; // make a touch scroll has resilient. .infinite-list-holder { width: 100%; position: relative; // relative is also a very important property. because of all its children will be position: absolute; } }
In the InfiniteList class we heavily use the Observable from RxJS, if you are not familiar rxjs, you can find some material from the internet.
There some important notice when implement this component.
Do all DOM event binding in AfterViewInit lifecycle hook. and besides, you should use setTimeout() to trigger a immediate measurement. Because
this operation will change _containerWidth and _containerHeight in one tick which will cause an error in zone.js. so we need to schedule it to next tick.
scrollPosition subject is a BehaviorSubject, it has a convenience that a initial value will be emitted without need the scroll event. This is helpful to
initialize the layout of InfiniteForOf.
By now, we have all done. let’s use our component and directive together to make a list with infinite smooth scroll.
1 2 3 4 5 6 7
<divclass="demo-container" *ngIf="collection"> <infinite-list [rowHeight]="140"> <list-item-example *infiniteFor="let row of collection; let i = index" [item]="row" [index]="i">
</list-item-example> </infinite-list> </div>
In this case, we give the view height 140 to InfiniteList component and pass row local variable to ListItemExample component, the actual list item will
be rendered by ListItemExample component.
The real component has some additional feature which can tell the list item component current scroll state. This will be helpful to make some decision
when user is performing a fast scroll and avoid unnecessary resource loading.
When working with HTTP API of an backend, you need to handle various response from those APIs and make your own reaction on either success or failure response.
But those APIs are not always designed RESTfully, It may not indicate an error status using the status code of HTTP. Instead, it may use an special field in the
response body to indicate a status of an response. This implicate an burden on the developer who will not be able to use the facility provided by the
framework like $http. Normally, $http() would return an promise object which can be chained with then method to handle both success or failure response.
But when an HTTP request doesn’t using HTTP status code to indicate its result, your error handlers will never be called.
In this case, you may need to check the response entity carefully to see whether its special field indicates its failure status.
I’v also encountered this issue when joining a new team. And I think I can’t change the API definition. So the only way to save time is do some tricky.
And this issue can be easily solved by using $http interceptors.
Assume that I have an API which return an object like this.
1 2 3 4 5 6
{ "status": 0, // 0 indicates an successful request, otherwise the request is a failure one. "data": { }, // this is what the real data resides in. "message": null// If status isn't 0, this message will contain the error information. }
Well, this API definition is very straightforward though it is not follow the RESTful style. What I need do is to intercept every response made from this API
and check the value of status. If it is not 0, change the statusCode of the response object to >=400. Besides, that I also want to make an global interceptor
to achieve this so I can get rid of writing same check code everywhere.
Let’s start to see what $http interceptors can help.
According to AngularJS Document Interceptors are factory which can modify request and response.
You need define some interceptors and push them into $httpProvider.interceptors array in your config function.
Let’s define an interceptor to check the status and reject the response if status code is not 0.
Assume we have an API pattern is /api/:someTarget (:someTarget is an parameter which can be changed by need).
var restInterceptor = angular.module('RestInterceptor', []);
restInterceptor.factory('RestInterceptor', function($q) { return { // response function will be invoked when request responds with successful status. // This is usually means the status code is 200~299 or an redirect response response: function(response) { var apiPattern = /^(?:\/api\/)\S+/; // we need filter the config object to ensure only check our API response. if(apiPattern.test(response.config.url) && typeof response.data.status !== 'undefined' && response.data.status !== 0) { //here we modify the http status code to 400 indicates this should be treated as an error. response.status = 400; // reject this response will let the end point caller's error handler be called. also, you can // chain an responseError interceptor to handle this error. return $q.reject(response); }
return response; } } });
This code snippet create an interceptor to check the normal response whose HTTP status code is usually 200, but modify an response if its data.status doesn’t
equal 0. and modify the HTTP status code to 400. so we can treat the API as an RESTful API and All the facility provided by angular or three party dependency
can be used directly without redundant check code.
The rest job is to make the interceptor work, we need to push this factory into $httpProvider.interceptors. Note that the invoke order of response and responseError
interceptors are in reverse registration order. This is not clearly documented in official document.
1 2 3 4 5 6
var app = angular.module('myApp', ['RestInterceptor']); app.config(function($httpProvider, RestInterceptor) { // if you have other interceptors to handle error response, make sure to push "RestInterceptor" at last. $httpProvider.interceptors.push('OtherErrorHandlerInterceptor'); $httpProvider.interceptors.push('RestInterceptor'); })
Now you can write your code without need to check whether you got an error in your success handler.
1 2 3 4 5 6 7 8 9 10 11 12
var app = angular.module('myApp'); app.controller('SomeController', function($scope, $http){ $http.get('/api/first-item') .success(function(data, status, headers, config) { // write your code for successful request // result object will be always valid. console.log(data); }) .error(function(data, status, headers, config) { console.log(status); // will print 400 when data.data.status != 0 }); });
Next time, I will use interceptor to write a notification module which will automatically make a toast notification to user when an API request
has failed. And will combine with the RestInterceptor I just have wrote.
In AngularJs development, we use custom attribute in our directive is nontrivial things. you can even use some attributes which may already be defined
in W3C standards of that element. well, this doesn’t matter at most circumstance. But it is not recommended to override the meaning of those attribute
originally defined by W3C. I have paid for this.
I have a directive nya-bootstrap-select which using a value attribute on list element. I give this attribute
a new meaning that its value will be the option value for predefined options. It works well in AngularJS apps until I tried to add some e2e test on
it using Protractor.
In Protractor elements are selected by the webdriver api and I hasn’t look into the implementation of selenium, but I can sure it may take the W3C standard
and make its own implementation to retrieve the value of value attribute.
As the W3C standards says:
This integer attributes indicates the current ordinal value of the item in the list as defined by the <ol> element. The only allowed value for this attribute is a number, even if the list is displayed with Roman numerals or letters. List items that follow this one continue numbering from the value set. The value attribute has no meaning for unordered lists (<ul>) or for menus (<menu>).
The list element has a value attribute which only accepts integer value. Although I can use a String value in my AngularJS app but this is not warranted
by standard and can varies between implementations. Just as the selenium implementation, the WebElement.getAttribute(‘value’) on my directive always
return 0. This is not my expected.
In conclusion, It is recommended for those who want to use some predefined attribute on their own directive to look up the standard whether its behavior has already been defined to
avoid conflicts and variants between implementations.
Last week, I completed my new hexo theme, but newly added page were broken because the stylesheet were not updated with the page. This was caused by the cache either on browser side or on the CDN of github pages side.
So I decided to solve this issue by using a method to busting the cache whenever I have updated the assets files.
If anyone have ever used yeoman to generate an angular project. You may find a grunt task in the generated Gruntfile called usemin.
This task combined with several other task can concatenate your stylesheet and
javascript files then minimize those files, at last a file revision task is executed internally. The key of busting cache is the file revision task which will calculate your files’ hash value and use the value to
rename your file, this will totally solve the cache issue. whenever your file changes, the hash value changes and you get a different filename of assets.
Back to the hexo theme project, I found it is hard to use the grunt task directly in my project because those task will modify the html or template file to update the script and link tag in order to
revision the assets file name. But hexo template file should only be modifed by programmer and generate html file by hexo. So I think it’s time to write a similar procedure by myself using hexo api.
Hexo provide two api helper and generator to generate tags in template and generate files with specified path. I will use this two api to keep the reference in template update and generate the new file with hash prefix file name.
Because I can’t ensure the execution order of these two api, the concat and minified operation are abandoned.
First let’s write a file hash method. This method accepts two arguments: file absolute path and hash digit length. because we don’t need the entire hash string to name asset file. the return value will be the new file name prefixed with a hash string
1 2 3 4 5 6 7 8 9
var fs = require('fs'), path = require('path'), crypto = require('crypto'); // modules above will be shared in the following two code blocks. functionfilehash(filepath, digitlength) { var hash = crypto.createHash('md5').update(fs.readFileSync(filepath)).digest('hex'); var prefix = hash.slice(0, digitlength); return prefix + '.' + path.basename(filepath); }
This method will be called by helper and generator to get the assets files’ hash value file name.
Now let’s begin from the generator. this api will let me to provide an array which tell hexo to write some files with specified path. I can copy the assets file with hashed file name.
var themeSourcePath = path.resolve(__dirname, '../source'); // we need the theme source path to find the assets folder var hashLength = 8; // this is define of the generator. hexo.extend.generator.register('filerev', function(locals) { // find all directories in theme source directory. var directories = fs.readdirSync(themeSourcePath); var outputData = []; directories.filter(function(dir){ return dir === 'css' || dir === 'js'; }).forEach(function(dir){ var files = fs.readdirSync(path.join(themeSourcePath, dir)); outputData = outputData.concat(files.map(function(file) { return { path: dir + '/' + filehash(path.join(themeSourcePath, dir, file), hashLength), // call filehash method we write before. data: function() { return fs.createReadStream(path.join(themeSourcePath, dir, file)); } }; })); });
return outputData; });
This generator will generate a set of new file with the hash prefix and its original folder structure in public folder when you run hexo generate.
With the hash prefixed file generated properly, we have to update the reference in script and link tag. here we using helper to define an ejs helper called usemin to generate our script and link tag.
1 2 3 4 5 6 7 8
hexo.extend.helper.register('usemin', function(input) { var filepath = path.join(themeSourcePath, input); var dir = input.split('/'); var ext = path.extname(input); var newFilename = filehash(filepath, hashLength); var newPath = path.resolve('/', path.join(dir.slice(0, dir.length - 1).join('/'), newFilename)); return ext === '.js' ? '<script type="text/javascript" src="' + newPath + '"></script>' : '<link rel="stylesheet" href="' + newPath + '">'; });
Put this scripts file in scripts folder under my theme directory, the script will be loaded by hexo automatically. Now there are only one step to get the goal, modify template using the usemin helper
In head.ejs
1 2 3 4 5
<head> <!-- other tags... --> <%-usemin('css/styles.css') %> <%-css('fancybox/source/jquery.fancybox.css') %> </head>
In scripts.ejs
1 2 3 4
<!-- other tags... --> <%-usemin('js/jquery.js') %> <%-js('fancybox/source/jquery.fancybox.js') %><!-- we can't process this file, so use the js helper --> <%-usemin('js/caption.js') %>
When I run hexo generate, the index.html will be generated by hexo which contains head.ejs and scripts.ejs part
1 2 3 4 5 6 7 8 9 10 11
<head> <!-- omit other tags... --> <linkrel="stylesheet"href="/css/2bb849c6.styles.css"> <linkrel="stylesheet"href="/fancybox/source/jquery.fancybox.css"> </head> <body> <!-- omit other tags... --> <scripttype="text/javascript"src="/js/cf26f8f0.jquery.js"></script> <scriptsrc="/fancybox/source/jquery.fancybox.js"type="text/javascript"></script> <scripttype="text/javascript"src="/js/33415e49.caption.js"></script> </body>